Helpful information
Timing: Check seed packet for recommended sowing time
Where to do it: Indoors or outdoors
Garden space: Large garden, small garden, balcony, indoors

Timing: Check seed packet for recommended sowing time
Where to do it: Indoors or outdoors
Garden space: Large garden, small garden, balcony, indoors
Sowing seeds is also available as an easy read PDF guide. Find our easy read guides here.
A wonderfully wide variety of plants can be grown by first planting seeds into trays. Here are some good plants to start with. You can read the information on any individual seed packet to discover if it is suited to being sown in a seed tray.
Vegetables and herbs
Tomatoes, peppers, chilies, basil, parsley
Flowers
Geraniums, cornflowers, poppies, marigolds
Some plants that have very long roots, like sweet peas, are better grown in root trainer pots or toilet roll tubes.
The excitement of seeing my own seeds growing into little baby plants is one that I will never lose or forget.
Nikki, gardening blogger
If small seeds seem too fiddly, start with larger seeds such as courgette, sunflower or even garlic bulbs. Plant these into small pots instead of trays.
You can skip seed sowing completely and buy plug plants instead. These are young plants that have already germinated from seed. Plant them directly into the ground or into pots and containers.
Essential items
Optional items
Follow these steps to sow seeds in trays with ease.
Step 1: Gather what you need

Get together all the items in the ‘what you need’ list above. Find a suitable space in your home or garden. This could be indoors, in your conservatory, greenhouse or outside at a table.
Make sure your seed sowing area is at a comfortable height, especially if you have difficulty bending. Make sure it’s easy to reach everything you need.
If you are sitting down, have your elbows and shoulders at right angles. This avoids pressure on tendons and joints.
If you are using a tidy tray and have any visual impairment, put bright yellow tape around the edges. This makes it easier to see the working area.
Step 2: Prepare your compost

Open your compost bag. Mix it around with your hands and break up any big lumps (wear gardening gloves if you wish). This helps air and water get into the compost, which will help the plant grow.
You may choose to mix perlite or sharp horticultural sand into your compost to improve drainage. This is optional, not essential.
You don’t have to buy huge bags of compost. Smaller 10-litre bags with handles for carrying are available.
Scissors may be necessary to open the compost bag at this stage.
If you find it hard to mix compost in its bag, put a manageable amount in a washing up or mixing bowl. This way you can work from a better height.
Step 3: Fill the seed tray with compost
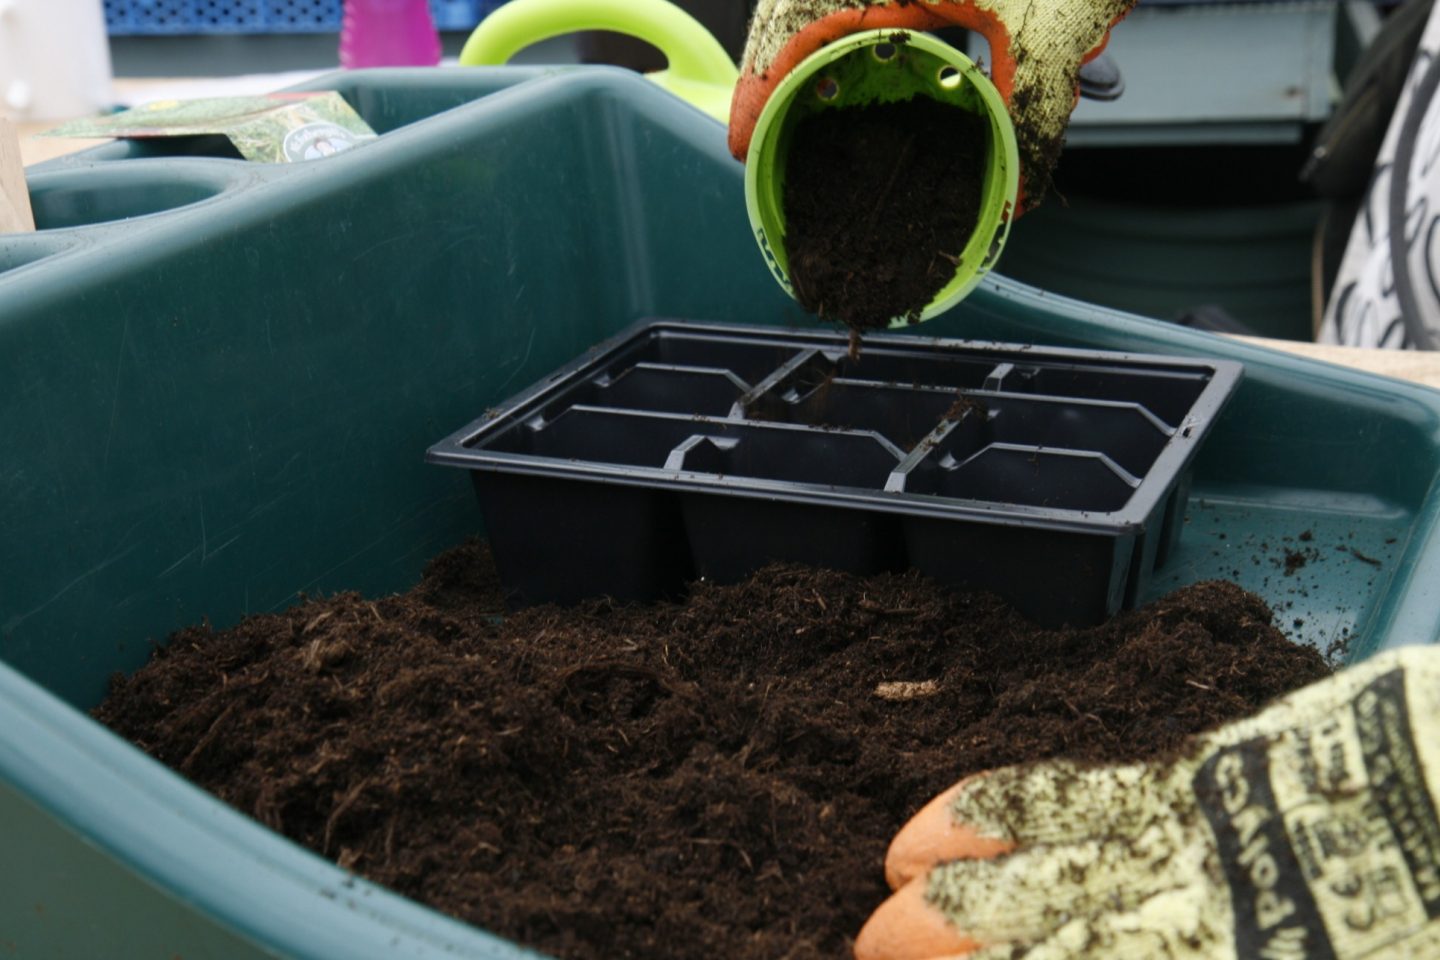
Add your compost to your seed tray until it is slightly overfilled. Then use your hands, or a ruler, to gently sweep the compost so it is flat and level.
You want the compost to end up a few millimetres beneath the top edge of the seed tray. Lightly tap the side of the compost tray to help the compost to settle.
If the compost is filled to the top, when you water your seeds, the water can run off the edge taking your poor seeds with it! If the compost level is too low, it stops the seeds getting enough light. This can make seedlings grow tall and ‘leggy’ (a bit thin and scraggly).
Find a scoop to help fill your seed tray, like a small flowerpot. Remember that you don’t have to fill your tray in one go.
A tidy tray or washing up bowl will help reduce mess.
Step 4: Place the seeds on the compost
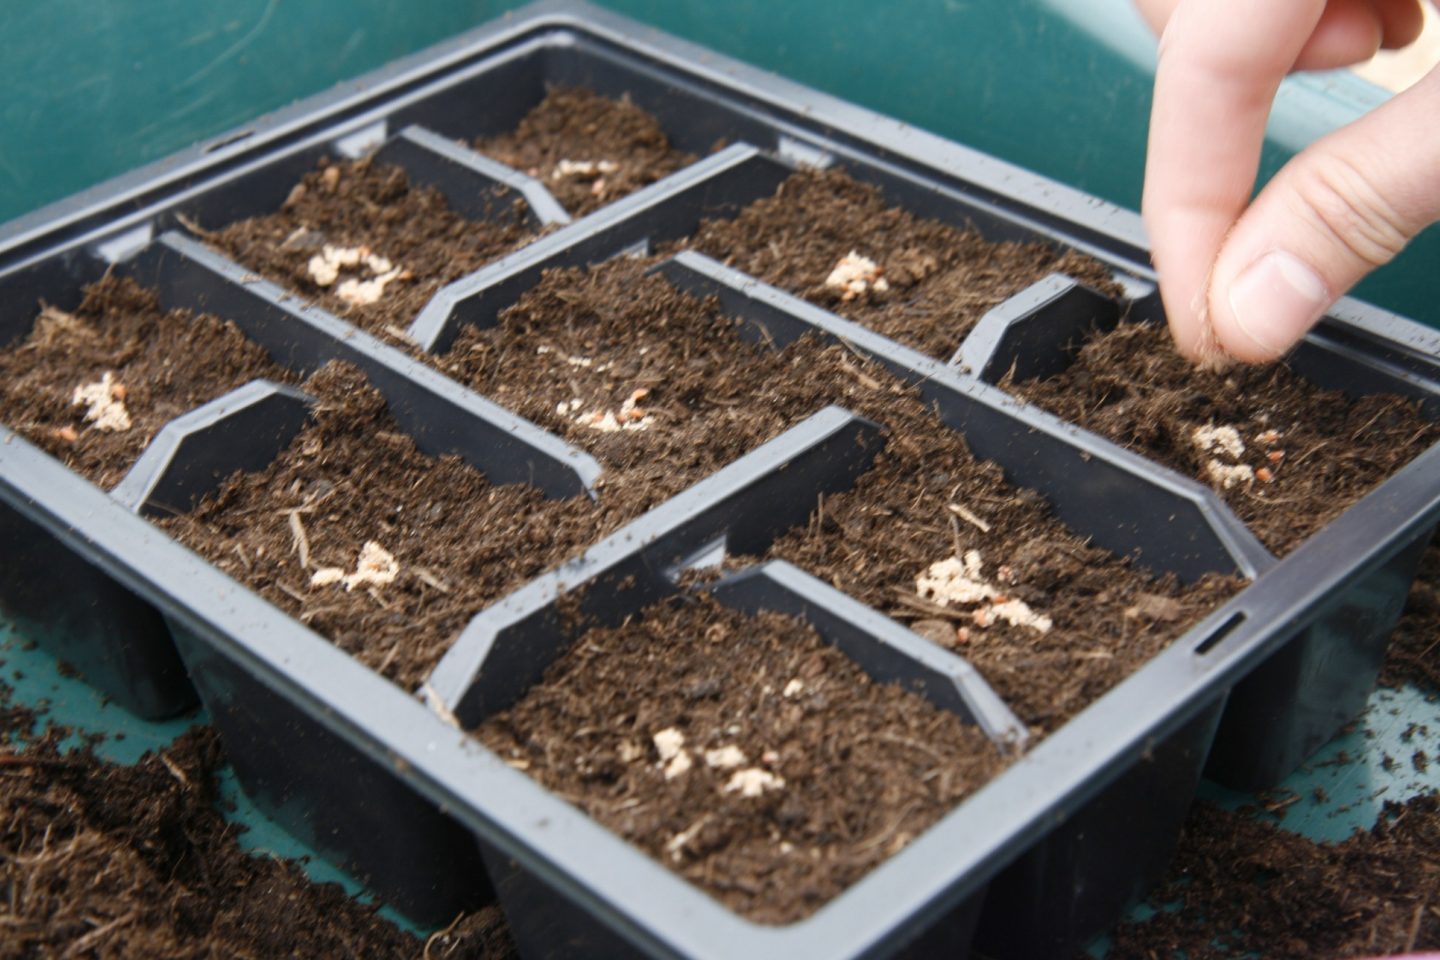
If you are using a modular seed tray, place two or three seeds in each section. This number can vary depending on the size of the plant and how reliably it grows.
If using a non-modular seed tray, check the seed packet for advice on distance between seeds.
Sowing seeds can be fiddly, especially if you have arthritis or a weak grip. Do little bits at a time and take breaks.
Scissors may be necessary to open the seed packet at this stage.
As you sow seeds, keep your spare hand on the seed tray so you can methodically work your way through each section. A stick or plant label can be helpful to mark your spot, in case of an unexpected distracting phone call!
Step 5: Cover the seeds with compost
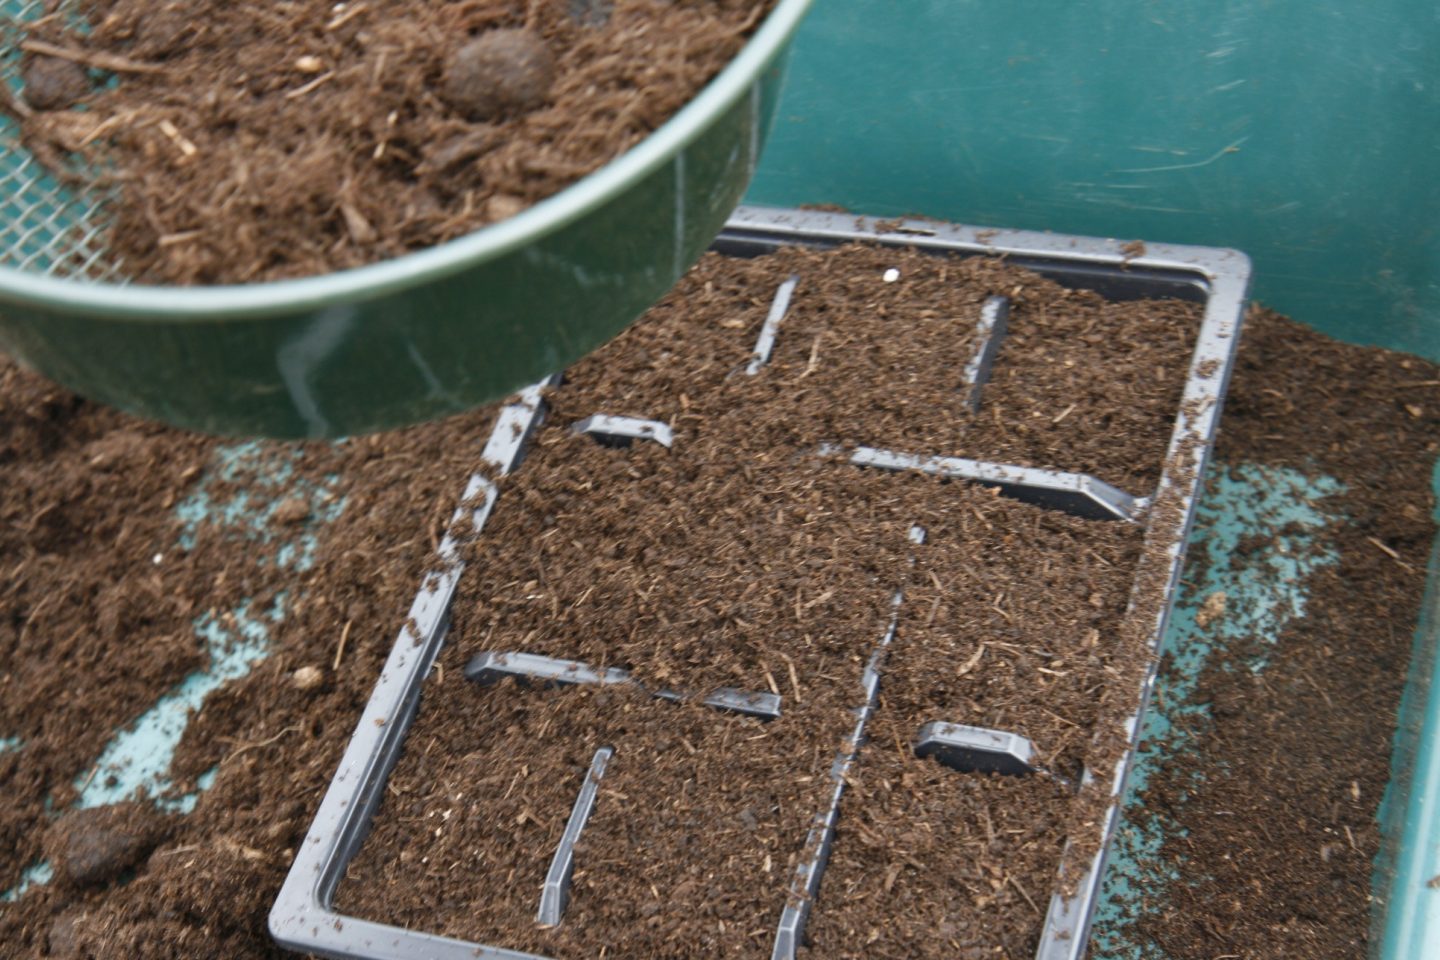
Most seeds need a fine layer of compost sprinkled over to cover them. Check the seed packet for advice. Gently tap the side of the tray to remove excess compost once added.
If you are worried about being heavy handed, use a sieve/colander to sprinkle compost over your seed tray.
Larger seeds can be gently poked under the surface of your compost.
Step 6: Label your plants

Plant labels are fantastic to remind you what you planted! Add the date sown so you know how long your seeds take to germinate.
Place labels at edge of tray facing out to let you easily identify what each tray contains.
A simple way to make a plant label is to stick the plant packet on a stick in the seed tray.
If you have sight loss, there are a variety of options available to help you create larger or easier to read labels. Some gardening companies produce extra-large labels. A range of large clear print, coloured, tactile and braille labels are available from the RNIB.
Step 7: Give them a water
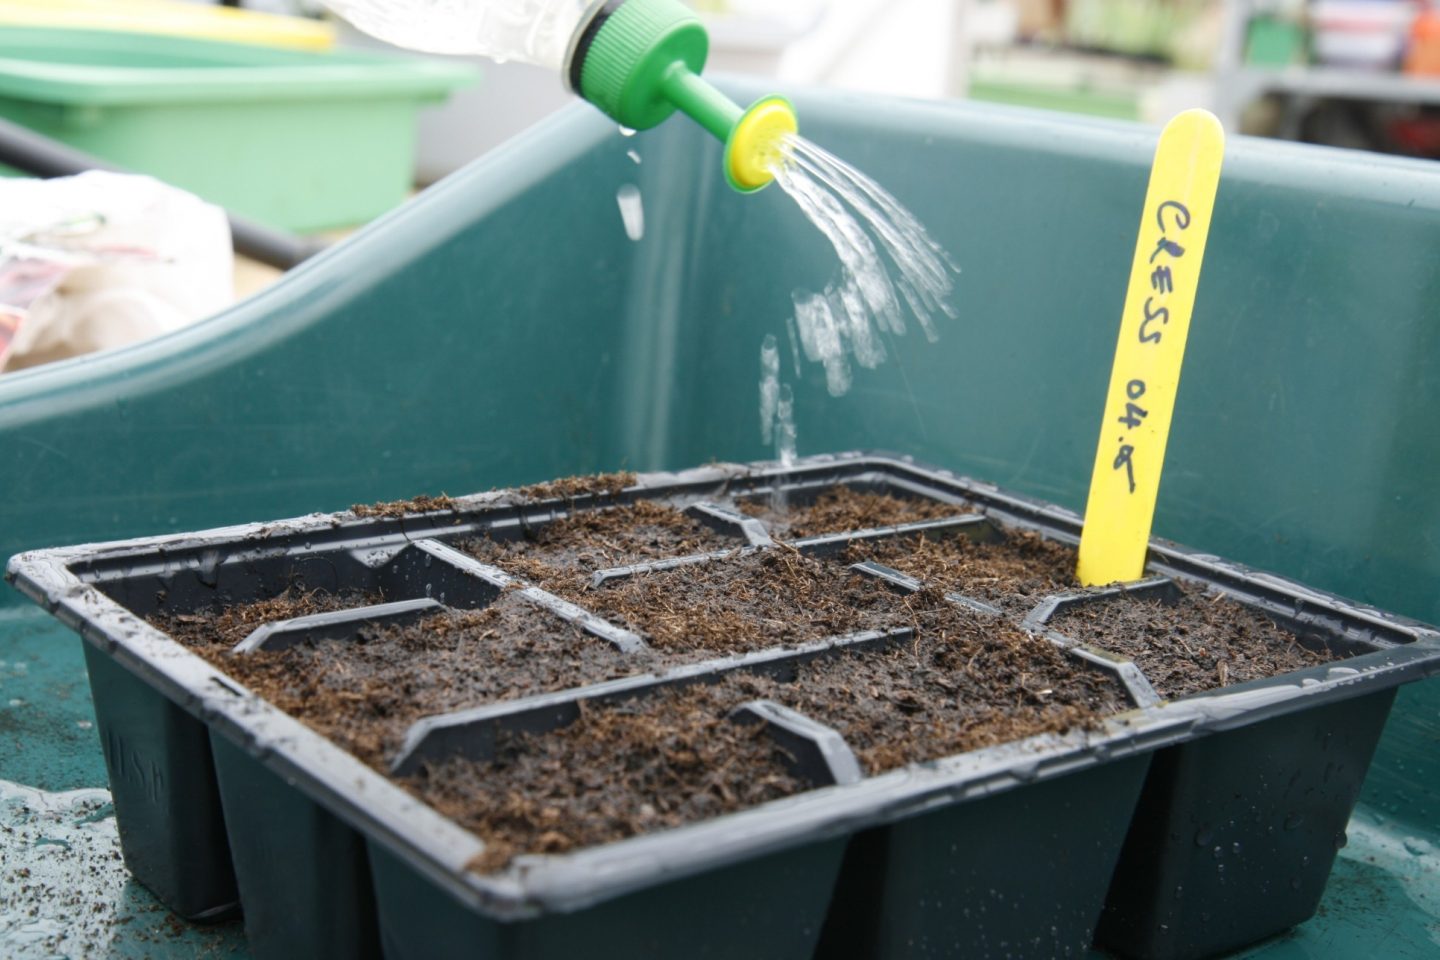
Your new seeds will be thirsty! It’s time to give them a gentle water. You can either do this by watering from above or from underneath.
If watering from above, the standard method is to use a watering can with a rose on the end. A rose is a large, circular nozzle attachment with tiny holes in it, allowing water to come out as a gentle sprinkle. When watering, you want the soil to become moist, not soggy.
If watering from underneath, sit your seed tray in another tray of water. Leave it soaking until the seed tray feels heavy to lift. This approach stops your seeds getting washed away or being pushed too deep into the compost.
Small watering cans are available from garden centers to minimize heavy lifting.
Bottle top waterers for plastic bottles are useful and good for reusing old bottles.
Lightly water your compost before putting it into the tray. This will mean it is already moist when you sow seeds.
Step 8: Position your seeds

Place your seed tray in a light spot. A warm windowsill, preferably facing south, is good. You could also put your tray in a greenhouse or mini propagator if you have one. Make sure they are somewhere you can easily reach and monitor.
Position the tray away from draughts, which can dry out compost and harm tender seedlings.
Your seeds are now successfully sown and in place. This is a great time to reward yourself with a cup of tea!
For the best chance of success with your seeds, keep the compost moist but not saturated. Use a watering can with fine rose or indoor water spray.
Some fabric cut to size and placed under your seed tray will hold moisture meaning you have to water less.
Hopefully, you will soon see the miraculous first green shoots poking through the soil as your seeds germinate. Once they have grown big enough, the next stage is 'pricking out'. This means carefully moving them into bigger pots.
If you used a modular seed tray, you may not have to prick out your seeds. You may be able to leave them for longer and jump straight to planting them out . This is a great way to make seed sowing that bit simpler!
There are no mistakes in gardening, only chances to learn. It’s very normal for some seeds not to germinate, or others not to grow well. Don’t be disheartened. If this happens, just look at their growing location and see if there is anything you could change next time.

Potting on young plants gives them the extra room they need to grow. Follow our step-by-step guide to simpler potting on.


